S H A D E R S
If you want to hack and crack Q3 learn how to make shaders.
Stuff you might need
I am prepared to do some typing if you are prepared to do some reading. Shaders is a very complex subject for beginning Q3 mappers. So I will do my best to explain myself. If you want even more detailed information read the shaders manual (900k), it will explain everything you need to know about shaders. If you want to follow along with me you need to download the EditPad program, which also makes a good replacement for NotePad.
From here on this page is almost an exact copy of Alvar Jansson's tutorial for quake3mods.net, alvar@home.se I used most of his exact words and all of his screenshots. I know I said that I would make my own, but I was kind of short on time so I just copied, pasted, and cleaned up this tutorial a bit. Why should I rewrite it when it is in it's most perfect form to start with? Again, Sorry Alvar, but the point of this is so that people can learn, after all I learned from quake3mods.net.
Introduction to Shaders
1: What is a shader?
A shader is a script, that tells the q3 engine, how to treat the surface,
a shader may not only change the way a surface looks, but also the actual
shape of it, (like water waves). The shader also affects how the surface
behaves in the game (like if it is nonsolid, or a water surface)
2: How do I use shaders?
You have probably used shaders already, you see, most of the
"textures" in q3 radiant is actually shaders. You can tell the
difference by looking at the thumbnail in the texture window, all shaders
have a white border. It is not necessarily the texture that shows in the
editor, that you will see in the game.
The shader scripts
3: How do I make my own?
This is not as hard as you might think. First, you make a new shaderfile
in the baseq3\scripts path, it should have the extension .shader, you may
want to call it the same name as your level, like if you made some cool
blood shaders for use in your splat.map, you could call your file
splat.shader, for this tutorial, create tut.shader. Now, we have to make
an entry in the file shaderlist.txt. this is to make q3radiant load our
shaders, type tut in the end of the file. To see our shaders in the
textures menu, we also have to make a new folder under the textures
folder, call it the same as your shaderfile (baseq3\textures\tut\).
If you now (re)open q3radiant, you will see a new entry in the textures
menu called tut, for now, it is empty.
Creating an Actual shader
Ok, we are now set up for our first shader, we will start out by adjusting the strength of a light emitting texture, this is by the way a good place t point out the fact that neither the Surf flags nor the Content flags in the Surface inspector have ANY effect in quake 3, they are ONLY for quake2 editing. The surface inspector is only good for sizing/moving textures in q3 editing.
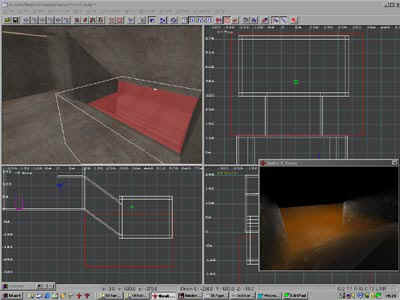
Let's get started! make a small room, make two lamp brushes and apply the base_light/baslt4_1_2k shader to the bottom face (and of course a non-light texture to the other faces).

(As you see you can run q3 in a window, at the
same time as q3radiant, I doubt this will work without a sturdy ammount of
ram (like 128 mb)) So, what if we want a little weaker light on one of the
lamps? well, then we have to make a shader of our own! Open the texture
window (textures in use) and shift click on the light texture. If editpad
is correctly installed, it will now open, browsing down to the beginning
of the shader. Now select the whole shader (as you probably have guessed,
the shader consists of the declaration, and all the indented text,
including the brackets). Copy the selected text, now open tut.shader (your
empty shader script which we created earlier) and paste the text, we
should now be here:
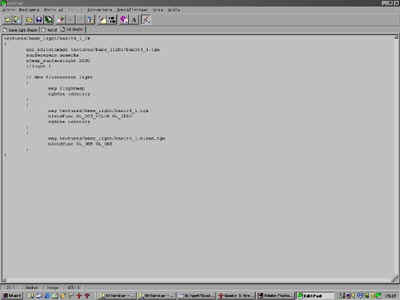
first, to avoid conflicts, rename the shader. This is done by changing the
line
textures/base_light/baslt4_1_2k to textures/tut/mylight_2k
Now save the shader script choose textures|shaders|Load all (reload) from
the q3radiant menu to reload the shaders, you should now see your shader
if you load the texture set textures|tut. Apply your shader to one of the
lamps, and bsp the map. The map should look the same. And now for the
actual change! Enter the shader script and change the line
q3map_surfacelight 2000 to q3map_surfacelight 500 This will
cut the amount of light emitted by the surface by the half. to reflect the
change, rename your shader to mylight_500. reload the shaders, and apply
your new shader (q3radiant will think that your old shader is still there,
I suppose this is a bug, and the old shader will disappear next time you
restart q3radiant). Bsp the map, you will now clearly see that the left
lamp, which we edited has a more dimmed light.

So, how do they get that fancy colored light then? This one is not as
straight forward... If you study the .pk3 files, you can see that the
light textures also have a blend texture, this is a picture of the light
emitting parts of the light, for example, the blend file for baslt4_1.tga
is baslt4_1.blend.tga
/*baslt4_1.tga baslt4_1.blend.tga */
In quake 3, the blend texture is drawn fullbright,
using the formula:
blendfunc GL_ONE GL_ONE
this texture is also drawn last, so that it covers the other textures.
When rendering the lightmap, q3map uses the average of all the pixels in
the texture. For our light, this means gray, with a little brown, but if
we want a blue light? Well, if we take a look at the shader:
textures/gothic_light/ironcrosslt2_2000
it contains the line
q3map_lightimage textures/gothic_light/ironcrosslt2.blend.tga
This makes q3map use the specified texture, instead of the default. This
was made, because the designer wanted a more yellow light than the
original texture would give. Now we want to make a cool blue light! Then
we need a blue lightimage. I saved you the trouble. download the tga by
pressing the picture. (right-click|save target as)

Place it in your baseq3\textures\tut folder.
Copy the entire shader script nd paste it below, so that you have two
identical shaders. Rename the new one to
mylight_500_blue
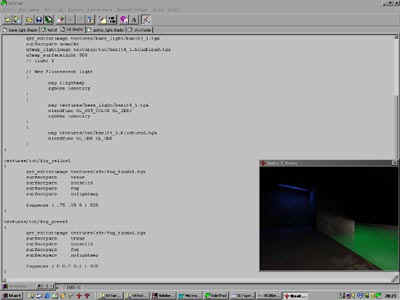
Now insert the line
q3map_lightimage textures/tut/baslt4_1.blueblend.tga
just above the q3map_surfacelight line. change the
map textures/base_light/baslt4_1.blend.tga
line in the final shader stage to
map textures/tut/baslt4_1.blueblend.tga
this will give the texure a blue look too.

I'm having a kind of fullbright problem with the fullbright map not
showing up (the lamp is very dark), but dropping down the console helps.
Now that you have a clue of what shader editing
is all about, we are going to do a thing that a lot of people has asked
about, changing the look of fog. Create a pit where the fog will reside,
and make a big brush that covers the pit, remember that only one side of
the brush should be visible, the fog may be bigger than the space that it
should fill, the brushes inside it will show up correctly. Shift-click the
shader, (that one didn't work for me, if it just steps to the end of the
sfx.shader, use the find function to search for fog_intel, or use the go
to line function and type in 5020). Copy the fog_intel shader and paste it
to your own tut.shader.
Rename the shader to textures/tut/fog_yellow1 Reload the shaders in
q3radiant and apply your yellow_fog1 to the fog brush. Bsp, and you will
hopefully see the yellow smog.
But, we would like a green smog instead, so we have to modify the shader.
The fog's appearance is controlled by a function called fogparms. fogparms
( .75 .38 0 ) 800 means ( r g b ) distance-to-opaque
The r, g and b values are the same as for lights, they range from 0 to 1
and thereby controls the color of the fog. Distance-to-opaque is the
distance, in game units, from the player, to the point where the og stops
being transparent. Ok Ok, I want my green fog! Copy the shader and paste
another copy of it below, name it fog_green1 Very well, a nice poisionus
color is ( 0 0.7 0.2 ). (don't forget the spaces inside the paranteces,
your fog will just be a gray grid without them).
As you experiment with colors, a good thin to notice is that the shaders stand free of the bsp, if you want to experiment with different settings, well, except the q3map parameters (duh..), you don't have to re-bsp your map, just save the shader file, and restart your map (nom \map_restart won't work... use the \map command).
But, you have seen that flashy hellfog with moving textures on it, well, let's take a look at it! Snatch the hellfog shader from the sfx.shader and paste it to our file, rename it tut/myhellfog make a cosy little hellfog pit so that we can study it a little closer. As you see, it emits light, because the surfacelight parameter. There is also two texture passes, they both apply the same texture, though one of them is flipped, this makes for a darker texture, as well as a liittle more complexity. The tga texture is white, so we are free to create a nice blue strange hellfog, by changing the color to ( 0 0.1 0.4 ). But... even if I re-bsp the emitted light is red!, now this is a little problem, that we could easily fix by making a 16*16 (or whatever) tga file filled with blue, and specify it as q3map_lightimage, but today I am lazy so I specify our good old baslt4_1.blueblend.tga which is blue by nature. so, add the line q3map_lightimage textures/tut/baslt4_1.blueblend.tga
