T U T O R I A L 0 1
Here are the long awaited Walkthroughs.
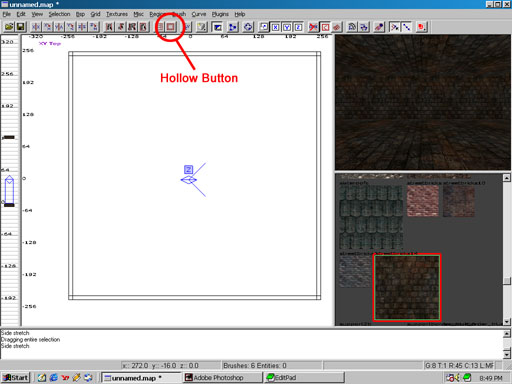
Ok now, this is where we are going to make a deathmatch map for Quake III: Arena. It should be good for 2 to 4 players. The first thing that we have to do is learn how to make a room, the most simple way of doing this is making a brush about 512 x 512 x 128 units. An average player stands about 64 units high. After you have created block, choose a texture for it. I am going to go with a gothic setting so I chose gothic_wall from the textures category and picked a nice brick texture. Now you will have just a block that looks like it is made out of bricks. If you want to actually make the block hollow click on the hollow button. This is what my room looks like so far.
First you should know that you can move around the camera (the blue angle on the 2D view) by pressing the arrow keys. Press , and . to make it strafe left and right and D and C to move it up and down. If you want to look up or down press A or Z. Now you might want to change the textures for the floor and the ceiling. This is very easy if you want to change the texture for an entire object then just SHIFT + LEFT CLICK on it in the 3D view to select it then click on a different texture. If you want to chage the texture for just a face the CTRL + SHIFT + LEFT CLICK on the face to select it, then choose the texture you want. I will now select the ceiling and floor textures for my room by changing the textures on the entire objects. I used a brick texture from the group gothic_floor and a wood texture from the group gothic_ceiling. Now we must add some lights. We could just right click on the 2D view and select LIGHT, but that would not look very real because people would ask "Where is the light coming from?" So we will add a torch model and some flame shaders that already give off some light.
I will add torches in each of the corners of the room. Right click in the 2D view and choose MISC/MISC_MODEL then a screen will come up asking you which model you want to use. I am choosing STORCH/STORCH.MD3. All you will see is a red box, to fix this push N to bring up the Entity Window and for Key it should say MODEL and for Value mine says "c:/program files/quake iii arena/baseq3/models/mapobjects/storch/storch.md3". This is not what you want it to point to, because it is trying to get a model off of your baseq3 directory when what you want is for it to get the model out of the pak file, so change it to "models/mapobjects/storch/storch.md3". This is what your Entity Window should look like after you have it set right.
Now you still should not see the model, you must first save your map then close down Radiant and open it back up again and load your map and then you should see your model. If you want to make the model face a different direction, do not try and rotate it. Just use the Entity Window and click on one of the direction buttons. Now we want to put some fire on the torch. Make a 24 x 2 x 48 high brush directly on top of your torch. Apply the common/nodraw shader to the brush and for the face you are going to see apply the sfx/flame1 shader. The nodraw shader makes the object or face invisible and you can walk through it. An easy way of applying the flame1 shader is first by selecting the front face of the brush then pressing S to bring up the Surface Inspector and type sfx/flame1 for the Texture box. Now you will have to resize the flame and move it around, you can do this by holding ALT + LEFT CLICK and dragging the texture around in the box. Now your Surface Inspector window should look like this.
The flame is only 2D right now, so if we want it to look 3D we are going to have to do the same thing, and rotate it 90 degrees so that the two brushes form a +. Only this time for the 1 face we want to use the sfx/flame1side shader. The only difference is that this one does not emit any light, so that you do not get any weird shadow effects. Here is what my Screen looks like after I have done all this.

Now if you want to make more of them just select the 3 objects and copy them. Make sure you remember to use the Entity Window to rotate to torch if you put it on different walls. I will now put one on each wall. After you do this you may need to re-adjust some of the fire shaders. I am also going to add some lights in the room since it is too big to be lit by all the fire.
Now lets make some weapons and ammo for the room, maybe some health or armor if you want too. For this all you have to do is right click on the 2D view and choose (make sure you push ESC to deselect everything) WEAPON/WEAPON_ROCKETLAUNCHER then make sure that it is sitting on the ground. I also added some health and armor from the ITEM category. If you want to test this map add a INFO/INFO_PLAYERDEATHMATCH in the room and from the menu choose BSP/BSP_FASTVIS.