MODELING WEAPONS
This is extremely fun, but hard.
From here on this page is almost an exact copy of Kalle 'T0oL' Hytönen's tutorial for quake3mods.net, (I have his permission to use this page) kalleh@sci.fi I used most of his exact words and all of his screenshots. I know I said that I would make my own, but I was kind of short on time so I just copied, pasted, and cleaned up this tutorial a bit. Why should I rewrite it when it is in it's most perfect form to start with?
This is a simple tutorial about how to get your
own custom weapons work in Quake3. That means I'm not going to teach you
how to model new weapons but how to make them work in the game itself. I
consider myself as a beginner in Quake MOD development and that is why
the quality of this tutorial is what it is. After all, this is my very
first tutorial ever.
Note! This tutorial is based on how I've
done it, and it may not be the best way (most likely). I think there are
several ways to do this. This tutorial assumes that you have these
programs/tools:
- 3D Studio MAX R2 or newer
- Pop 'n' Plugs plugin for 3D Studio MAX (MD3 import/export)
- Npherno's MD3 Compiler
And now, let's get started...
Step 1. Go to your /quake3/baseq3/ directory and open pak0.pk3 (use Winzip). Select 'machinegun_barrel.md3' and extract it to any directory.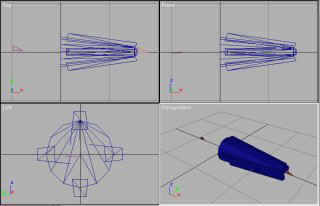 Create new directory called 'WeapTest' to your /quake3/ directory. Start
3D Studio MAX and press 'File->Import...' and select MD3 as filetype.
Import 'machinegun_barrel.md3' into 3D Studio MAX and after that you
should see the barrel of the machinegun (named b_barrel) and three tags:
tag_barrel, tag_flash and tag_weapon.
Create new directory called 'WeapTest' to your /quake3/ directory. Start
3D Studio MAX and press 'File->Import...' and select MD3 as filetype.
Import 'machinegun_barrel.md3' into 3D Studio MAX and after that you
should see the barrel of the machinegun (named b_barrel) and three tags:
tag_barrel, tag_flash and tag_weapon.
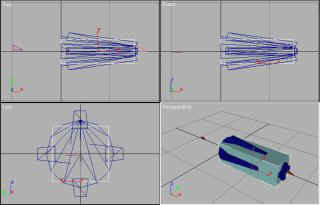
Step 2. As you can see from the Front Viewport, the barrel is facing right and starts from the origin. Press 'Box' button in Create->Geometry and go to Keyboard Entry. Change parameters to what they are in the picture below and press 'Create'. Now it should look more or less like the one in the other picture.
We'll use Quake3's default weapon 'machinegun' as a base here so that
it's easier and we don't have to create any tags.
Step 1. Go to your /quake3/baseq3/ directory and open pak0.pk3 (use Winzip). Select 'machinegun_barrel.md3' and extract it to any directory.
Create new directory called 'WeapTest' to your /quake3/ directory. Start
3D Studio MAX and press 'File->Import...' and select MD3 as filetype.
Import 'machinegun_barrel.md3' into 3D Studio MAX and after that you
should see the barrel of the machinegun (named b_barrel) and three tags:
tag_barrel, tag_flash and tag_weapon.Step 2. As you can see from the Front Viewport, the barrel is facing right and starts from the origin. Press 'Box' button in Create->Geometry and go to Keyboard Entry. Change parameters to what they are in the picture below and press 'Create'. Now it should look more or less like the one in the other picture.
Step 3. Press 'Select by Name' button and choose 'b_barrel' from
the list. Press 'Select' button. Delete object 'b_barrel'. Select the
box 'Box01' we just made and change its name to 'b_barrel' (not sure if
this is necessary). Let's not change the positions of the three tags
now, you can do it later. Now you could map textures to your weapon but
we don't go into that now.
Step 4. Make sure 'b_barrel' is still selected and go to 'Modify'
and press 'UVW Map'. Then click on 'More' and choose 'Unwrap UVW' Press
'Edit->Select All' to select everything. You might want to save your
work now. Press 'File->Export Selected...' and choose MD3 from the
Save type list. Type in filename 'machinegun_barrel.md3' and save your
work to '/quake3/WeapTest/models/weapons2/machinegun/'
Step 5. Start Npherno's MD3 Compiler and press 'Import Objects'
button. Open the .md3 file you just saved. Press 'Rebuild Normals' and
then 'OK'. Press Object: 'All' button to select all. After that press
'Export Objects' button and overwrite the old .md3 file.
That's it! You can now run Quake3 and test your new weapon!
Just open up a dos prompt and from your quake 3 directory type: Quake3.exe +set fs_game WeapTest
Just open up a dos prompt and from your quake 3 directory type: Quake3.exe +set fs_game WeapTest