C U R V E S
Curves can create beautiful architecture and deadly framerates.
From here on this page is almost an exact copy of Alvar Jansson's tutorial for quake3mods.net, alvar@home.se I used most of his exact words and all of his screenshots. I know I said that I would make my own, but I was kind of short on time so I just copied, pasted, and cleaned up this tutorial a bit. Why should I rewrite it when it is in it's most perfect form to start with? Again, Sorry Alvar, but the point of this is so that people can learn, after all I learned from quake3mods.net.
We have all seen the "trademark" of q3, the curved surfaces, they are everywhere, and adds a little extra to the gaming experience. They can also be used to create organic shapes (mouth in q3dm1) that was completely impossible before.

I have put together a nice little tutorial to get you started. curved
surfaces(or patches) can be created in a number of ways, the top eight
menu items on the curves menu, all create patches in different shapes. to
create a patch, first make a brush of the size you would like your patch
to be. then select one of the create commands
-
Cylinder:
Creates a patch cylinder from your brush
-
Other cylinders
-
Dense cylinder / very dense cylinder
Same as above, just denser mesh
-
Square cylinder
Creates a four side square pipe of patches.
-
End cap
An end cap is a halfpipe "U", commonly used to round off an edge or inverted for curved ceilings
-
bevel
This is a quarter pipe. half an end-cap that is
-
More endcpas, bevels
-
Square endcap
A square "U" of patches
-
Square bevel
An "L" of patches
-
Cone
A slightly rounded cone, used as teeth or spines, if you want to make a sphere, take a cone, and pull down the top vertex, then mirror it.
-
Sphere
Nope :-)
-
Simple patch mesh
This one makes a planar patch with the same x-y dimensions as your brush, with the number of control vertices (cvs) that you specify.
-
Insert / Delete, rows/columns
If you choose insert rows/columns they will come in from one end of your patch. if you select add rows/columns they come in from the other end. The same goes for delete.
-
Matrix
-
Invert
This inverts your patch, patches can only be seen from one direction, if yous patch is just a mesh of textured wires rom the side you want to wath it, use this command. if you want to view your patch from both sides, you have to thicken it(see below)
-
re-disperse rows/columns
This evil command straightens out your rows or columns of cv:s don't use it before you save, undo doesn't work with this one.
-
Transpose
Don't know, if you find out, drop me a note
-
Cap
Normal / Inv. bevel/Inv. endcap (don't know why they have different items here)
Puts a cap on your nice patch if it isn't too complicated. quite self-explaining dialog
-
Cycle cap texture
Cycles the direction of wich the texture is projected onto the patch, x y or z click here when you are about to texture a patch ant it looks really stretched out and wierd
-
Overlay Set/Clear
Shows or hides the cv:s of the patch
-
Thicken
This command makes a copy of your patch, inverts it, moves it a small distance and then seals the gap between the two with a lot of polygons. Use this if you want to watch a patch from both sides.
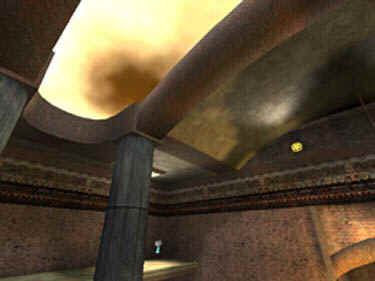
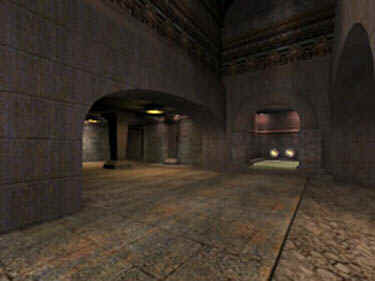
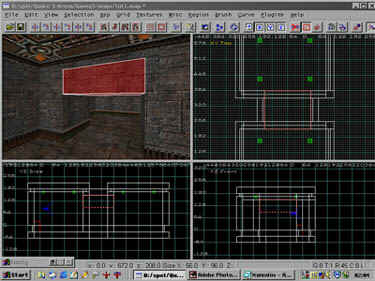
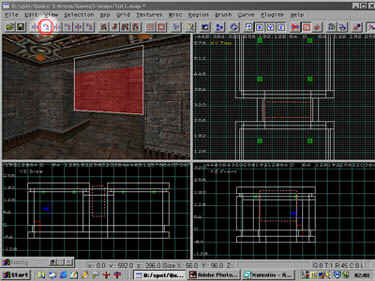
Phew, that's it now, let's get going. To start with we have two rooms and a fairly wide corridor. The corridor looks kind of blocky and boring, so we are going to use a curved surface to make a nice hallway.
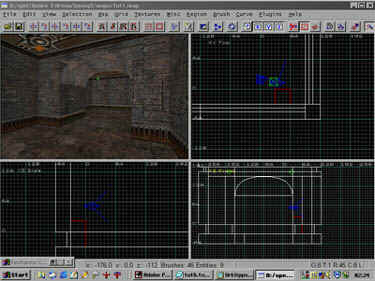
Now
we will create an endcap.
To accomplsh that, we create a brush, where we want our arch, use snap to
grid, so that the brush is precisely aligned to the walls.
Unfortunately an unpleasant bug in q3r makes it impossible to create an endcap in other than the xy- plane, therefore, we are first going to turn our brush 90 degrees on the x axis. to do this press the rotate x button
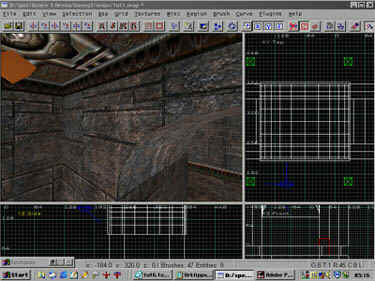
now make the brush an endcap by clicking curve|endcap. Return the endcap to its correct position by pressing the x-rotate-button 3 more times. the arch should now sit nicely in the ceiling. If it looks like a lot of textured wires from below, use the cap|matrix|invert command The thing should now look something like this
Well,
that was the easy part, now we are going to enter som of q3r's more byggy
functions. You might think that I am doing strange and unpractical things,
but I do them to work around the bugs.
First of all, we are going to cap the ends of the arch by adding an
inverted endcap cap :-/ select your patch and then select curve|cap|normal,
then inverted endcap from the dialog. yes, it looks strange, but we are
going to fix that now
Now
comes the really fun part, the textures. select a cap, this is easy if you
alt-shift-click a couple of times on the cap, unitl it is the only thing
selected. the arch should not be selected, and assign them a texture, you
might want the same texture as on the walls. press curve/cap/cycle cap
texture (shortcut Strl+Shift+N. ICQ might want to use these keys to put a
post-it note on your screen) until you can see the texture on the cap if
the texture isn't aligned nicely now, w have to align it manually.
ok, if you try to move the texture around the normal way (alt dragging or
shift+arrows) it will jump around in huge steps (a bug), instead press 's'
to bring up the surface inspector. put anothe zero before the five in the
horizontal and vertical shift-fielsds
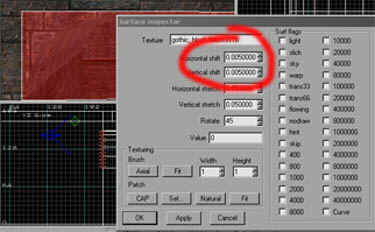
now push the arrows beside the numbers in the shift-boxes. as you can see, the texture moves a little bit, move the texture around until it fits. repeat on the other cap. Now select the arch. press 's' and then, in the "patch" group, press the "natural" button. this will make the texture bend over the arch in a good-looking way.
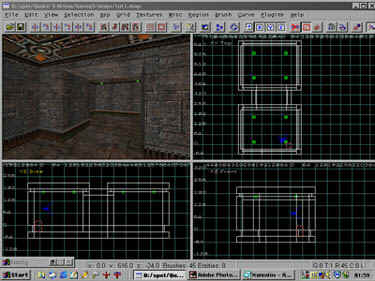
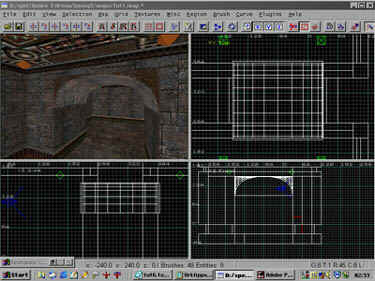
isn't that nice? There is some work left to do though. behind curves there should always be the caulk texture. So we'll cut up the walls supporting the arch _exactly_ by the edge of the arch using the clip function. select the brushes touching the arch's sides. Press the clip button (or press X) now place out 2 clip points (blue dots with numbers on them) in a horizontal line by the edge of the cap (look at the below screenshot)
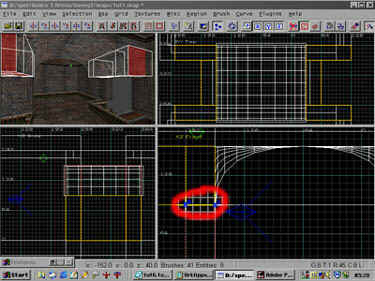
As
you can see it looks like the lower parts of the brushes has disappeared.
Fear not though but press shift-enter, this will split the brush in two.
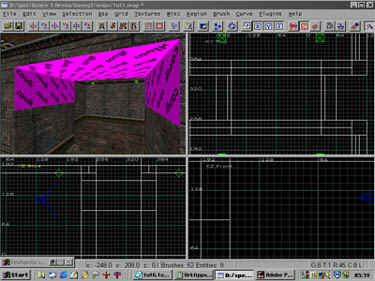
Now we are going to hide the patches so that we can se the underlying
surfaces. To do this uncheck to view|Show|show cruves. the patches are now
invisible.
Assign the common/caulk (yep the ugly pink one with text on it) to all the
surfaces under the arch
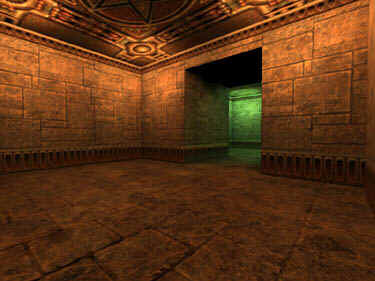
Unhide the curves and we are good to go!
Look how nice it turned out!
